Introduction
"Solo" (für Melodieninstrument mit Rückkopplung) by Karlheinz Stockhausen is a piece written for any solo melodic instrument and employs a feedback system to allow the soloist to create polyphonic music. Written in 1966 with its world premiere in Tokyo in the same year, its origin dates back to the same period as the composer's work "Kontakte". "Solo" uses the technique of recording onto tape with a single head together with a moveable arrangment of playback heads, allowing for the creation of complex sounds through accumulation.
The original version (with an analog technical set-up) requires a solo instrumentalist as 4 assistants (technicians): three assistants operating the opening and closing of sliders (L/R channels)–respectively the microphone, delay-line and output–and an assistant for the change of time values of the taps in the delay-line. During a performance a part of what the instrumentalist plays is captured by a two-channel recorder. Through a feedback circuit, the sections are recorded more or less densely stacked and processed with a variable delay time; the result is then played by two sets of speakers and mixed with the direct sound of the soloist.
The score (Universal Edition-Wien, 1969) consists of six pages of music and six pages of Form-Schema (the number six can be considered a key element), in addition to explanatory notes (very detailed) for the performance the composition. "Solo" is one of those compositions by the author employing "controlled alea" as a compositional language. Indeed many choices are left to the soloist and cover almost all the events: from the selection of a version, the positioning of the material, the types of tonal variation requests, the order of pages and more. In reality these faculty are provided as input by the composer through the management of macroscopic or microscopic order parameters, restricting the possible versions (virtually infinite) at a predefined or definable set of possibilities. In this piece, the role of the interpreter is very important in the creation of a performance that is always unique and unrepeatable every time.
SOLO_MV_10.1 [SOLO MULTIVERSION] is an algorithm that aims to implement digitally the original analog set-up (Technical set-up) for the performance (One-man-performance) of six versions of Solo für melodieninstrument mit rückkopplung by Karlheinz Stockhausen. The algorithm is written for the Macintosh environment using MacCsound and Csound. This project began in 2006 in collaboration with LEMS (Laboratorio Elettronico per la Musica Sperimentale) at the State Music Conservatory "G. Rossini" in Pesaro (Italy). I developed subsequent improvements to the algorithim until arriving at the current version: SOLO_MV_10.1. The algorithm aspires:
- to overcome the practical limitations that the original analog layout posed the interpreter. It is now possible to perform the composition as an instrumental solo accompanied by Personal Computer (Mac)
- to develop an application, using public domain software (Csound and MacCsound on a Macintosh), which is a valid support for real-time performance and a means to realize the requirements of Stockhausen's original setup (Technical set-up) in a digital environment
- to enrich the piece–tonally speaking–in both the instrumental and the algorithmic domains
Valuable facts about the algorithim include:
- that it employs, in a Macintosh environment, a front-end for real-time performance (i.e., MacCsound) and a language (Csound) that are freely distributed over the web, and are thus continuously evolving and accessible to all
- that it allows the performer the possibility of complete independence during the performance (One man-performance), and the freedom to move within the action while planning and controlling the algorithm
I. Preparation
Before running the SOLO_MV_10.1.csd file it is essential that:
- You make sure you have (MAC) Csound version 5.10 (or alternatively, version 5.09) and the frontend MacCsound version 1.3b4 (or 1.4b1) installed on your computer. Note that currently, MacCsound (version 1.3b4) works seamlessly with Csound up to version 5.09, whereas MacCsound (version 1.4b1) is also able to run with version 5.10 (SW) [i].
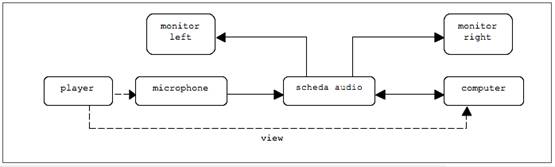
- You prepare the necessary technical design. This comprises: a microphone, a sound card, a computer, a pair of monitors (HW) and, of course, a performer and hopefully an audience that will listen!
Here is a diagram that shows the entire technical design for implementing One-man-performance of Solo by K. Stockhausen:
GUI
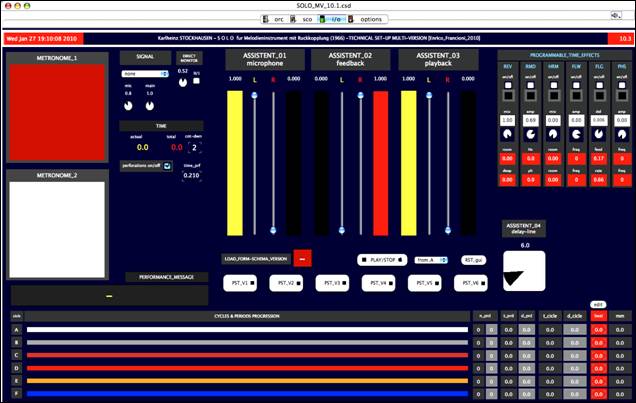
The graphical interface of SOLO_MV filled with MacCsound 1.4b1
II. Turn algorithm
After loading the
file SOLO_MV_10.1.csd with MacCsound, run the algorithm by clicking the Play button
(present in the upper right of i/o), or, alternatively, by pressing the
combination keyboard cmd-R.
![]()
The function f0 86400 (a dummy ftable) exists in the score and serves as a kind of Stand-by, ensuring that the algorithm is switched on but not yet active. At this moment only the following instruments will
be active (in this case, they are the only instruments in the score):
i"GUI_rst"     0     1           ; reset of kontrol (default state)
i"GUI_in"      1     86400       ; kontrol-in (invalue)
i"GUI_out"     1     86400       ; kontrol-out (outvalue)
i"absT"        0     86400       ; absolute timer and date
III. Setting of algorithm
a. Reset
At the application start-up all the controls will be automatically reset or set to the default values. However, in the i/o menu RST_gui is available to specify a different initialization:
![]()
The button (of the
“Button Score Event” type) will turn the instrument iGUI_rst (in the orchestra) on for a few tenths of a second. This will reset
all the controls.
b.Choice signal
Using the drop down Menu (a set of items), you can choose which type of input signal to import:
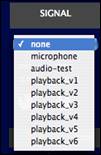
Options:
- none - no signal
- microphone - (a) microphone
- audio-test – a pre-recorded audio
- playback_v1 - a recording of Version I
- playback_v2 - a recording of Version II
- playback_v3 - a recording of Version III
- playback_v4 - a recording of Version IV
- playback_v5 - a recording of Version V
- playback_v6 - a recording of Version VI
This command is
related in the orchestra to a series of conditions under which, from the moment
the user clicks Play, the instrument instr signal decides which signal (gasig) to import. This depends on the number of
items currently active in the i/o, and might proceed according to a syntax like:
  if  gkin       ==    1     then        ; none
  gasig          =     0
  gasig_playL    =     0
  gasig_playR    =     0

  elseif gkin    ==    2     then        ; microphone
  asig           inch  1
  gasig          =     asig * gk_inch
  gasig_playL    =     0
  gasig_playR    =     0

  /*etc… */

  endif
N.B. the algorithm will produce an audio signal output on activation (after a count-down) only when SOLO_MV is able to find the location path of the selected audio file (necessary for audio-testing or for playback) .
c. Choosing the number of beats for Period
When the algorithm is turned on, you can set the numeric value of beats for a Period (in each of six Cycles) in the appropriate red Value Scroll text boxes.
In the Value Scroll boxes the value can be set in two different ways:
- Double-click the box and then type the numeric value using the keyboard
- Scroll the mouse up (to increase the current value) or down (to decrease the current value)
![]()
After the six values have been set, click the edit button to automatically load the number of beats per period (in the score of Solo each period corresponds to a staff). Note that in the original score, beats are marked by vertical dashed lines.
As demonstrated
below, the number of beats is set to the default values for each of the
six versions. If the user chooses to re-set the values in a custom way, the edit (Score Event Button) will update these new values of
the beat and, consequently, the metronome speed (in MM) in the user interface. This is done by the instrument edit_beat:
instr edit_beat

outvalue	"b1",	 i(gk_b1)
outvalue	"b2",	 i(gk_b2)
outvalue	"b3",	 i(gk_b3)
outvalue	"b4",	 i(gk_b4)
outvalue	"b5",	 i(gk_b5)
outvalue	"b6",	 i(gk_b6)

outvalue	"mm1", i(gk_b1) *60 /gi_p1
outvalue	"mm2", i(gk_b2) *60 /gi_p2
outvalue	"mm3", i(gk_b3) *60 /gi_p3
outvalue	"mm4", i(gk_b4) *60 /gi_p4
outvalue	"mm5", i(gk_b5) *60 /gi_p5
outvalue	"mm6", i(gk_b6) *60 /gi_p6

endin
d. Perforations
Perforations in Solo are short and/or temporary closures and re-openings of sliders by Assistants; they aim to create a more varied performance through interrupting the canonical repeats.
In the i/o, you can choose to activate or deactivate the Perforations through using the appropriate Checkbox.
![]()
This is also used to set the time value of the ramps (decay-stay on the 0-irise) of the sliders. If this is not satisfying for you, a temporal value (in seconds) can be specified in the Value Scroll text box, as for example:

Let's assume that it has been chosen to activate the Perforations at the level of code in the orchestra at the time of Play. This will activate a tool for each of the first four assistants aimed at the continuous generation of random time values–for maximum randomness, different values at each restart of the algorithm–that will be immediately copied into each type of Perforation (1 to 13 Perforations).
When in the Form-Schema the author asks for a single Perforation within a particular envelope
box, for example the first Assistant (left channel), then first
instrument rando1L pass a time value random (idur1a), between 0 and gi_denv1L instrument en_L1 (dedicated to the management of envelopes of Assistants). This
value will be the action-time of Perforation inside the same envelope.
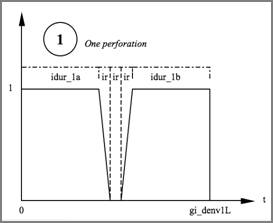
The time remaining
portion idur_1b will have the following duration:
idur1b = gi_denv1L – ((idur1a+(ir*3))
This calculation is more difficult when there is more than one Perforation. It is our opinion that up to 13 Perforations are required in different Versions of Solo!
e. Count-Down
Since this is a One-man-performance, this text box (Value Scroll) is particularly important as it allows you to set a count-down, in seconds, before the performance of Solo begins.

This value (i(gk_cdwn)) will be subtracted from the chronometric count-down and will be
the action-time for the calls of the instruments, as in the example
below:
schedule "playback", i(gk_cdwn), gi_dur
f. Choosing Version
You can choose which SOLO version to activate (from I to VI) using the six buttons of the central control box:
![]()
This will turn on the Meter (LED) corresponding to the selected Version. Contextually, the Label text box will show which version has been loaded:

This is what happens in the orchestra (for a detailed understanding follow the code comments).
The buttons of the type Button Score Event will enable (as in next example) with this score:
i"PRST1" 0 .1 1 1 0 0 0 0 0
the respective
instrument (instr
PRST1):
instr PRST1 ; Choice of instrument main caller (p4 = 1) - Version I gi_play = p4 ; accensione del led (p5) in i/o gi_led1 = p5 gi_led2 = p6 gi_led3 = p7 gi_led4 = p8 gi_led5 = p9 gi_led6 = p10 ; indication in the label or version number (I) if gi_led1 = 1 then outvalue "version", "I" elseif gi_led2 = 1 then outvalue "version", "II" elseif gi_led3 = 1 then outvalue "version", "III" elseif gi_led4 = 1 then outvalue "version", "IV" elseif gi_led5 = 1 then outvalue "version", "V" elseif gi_led6 = 1 then outvalue "version", "VI" endif ; presets cycle times - Version I gi_1A = 66 gi_1B = 113.6 gi_1C = 133 gi_1D = 151.8 gi_1E = 95.4 gi_1F = 80 ; Transmission values in I/O of cycle times - Version I gi_c1 = gi_1A gi_c2 = gi_1B gi_c3 = gi_1C gi_c4 = gi_1D gi_c5 = gi_1E gi_c6 = gi_1F outvalue "c1", gi_c1 outvalue "c2", gi_c2 outvalue "c3", gi_c3 outvalue "c4", gi_c4 outvalue "c5", gi_c5 outvalue "c6", gi_c6 ; Preset times of the delay-line - Version I gi_1a = 6 gi_1b = 14.2 gi_1c = 19 gi_1d = 25.3 gi_1e = 10.6 gi_1f = 8 ; transmission values in I/O of the timing of the delay-line - Version I gi_p1 = gi_1a gi_p2 = gi_1b gi_p3 = gi_1c gi_p4 = gi_1d gi_p5 = gi_1e gi_p6 = gi_1f outvalue "p1", gi_p1 outvalue "p2", gi_p2 outvalue "p3", gi_p3 outvalue "p4", gi_p4 outvalue "p5", gi_p5 outvalue "p6", gi_p6 ; calculate values metronome beats (MM) [passing through the values I/O] – V I outvalue "mm1", i(gk_b1) *60 /gi_p1 ; i(gk_b1):gi_p1=x:60 - es: 15:6=x:60 outvalue "mm2", i(gk_b2) *60 /gi_p2 outvalue "mm3", i(gk_b3) *60 /gi_p3 outvalue "mm4", i(gk_b4) *60 /gi_p4 outvalue "mm5", i(gk_b5) *60 /gi_p5 outvalue "mm6", i(gk_b6) *60 /gi_p6 ; Presets and calculating the number of periods for cycle - Version I gi_nprd1 = gi_1A/gi_1a gi_nprd2 = gi_1B/gi_1b gi_nprd3 = gi_1C/gi_1c gi_nprd4 = gi_1D/gi_1d gi_nprd5 = gi_1E/gi_1e gi_nprd6 = gi_1F/gi_1f outvalue "np1", gi_nprd1 outvalue "np2", gi_nprd2 outvalue "np3", gi_nprd3 outvalue "np4", gi_nprd4 outvalue "np5", gi_nprd5 outvalue "np6", gi_nprd6 ; Preset values and transmission beats for Period (default) - Version I gi_b1 = 6 gi_b2 = 15 gi_b3 = 19 gi_b4 = 25 gi_b5 = 10 gi_b6 = 8 outvalue "b1", gi_b1 outvalue "b2", gi_b2 outvalue "b3", gi_b3 outvalue "b4", gi_b4 outvalue "b5", gi_b5 outvalue "b6", gi_b6 ; Value of metronomic beats in MM (default values) - Version I outvalue "mm1", gi_b1 *60 /gi_p1 ; gi_b1:gi_p1=x:60 - es: 15:6=x:60 outvalue "mm2", gi_b2 *60 /gi_p2 outvalue "mm3", gi_b3 *60 /gi_p3 outvalue "mm4", gi_b4 *60 /gi_p4 outvalue "mm5", gi_b5 *60 /gi_p5 outvalue "mm6", gi_b6 *60 /gi_p6 ; Cycle (A,B,C,D,E,F) from which to start the Solo - Version I if i(gk_cicle) == 0 then gi_dur = gi_1A+gi_1B+gi_1C+gi_1D+gi_1E+gi_1F ; ovvero: p3 elseif i(gk_cicle) == 1 then gi_dur = gi_1B+gi_1C+gi_1D+gi_1E+gi_1F elseif i(gk_cicle) == 2 then gi_dur = gi_1C+gi_1D+gi_1E+gi_1F elseif i(gk_cicle) == 3 then gi_dur = gi_1D+gi_1E+gi_1F elseif i(gk_cicle) == 4 then gi_dur = gi_1E+gi_1F elseif i(gk_cicle) == 5 then gi_dur = gi_1F endif endin
g. Choice of effects (Programmable time effects)
It is also possible to set effects (reverb, flanger, ... RS) on the keypad, using the appropriate check Checkbox [on/off]:
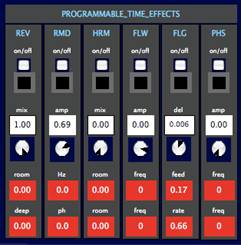
effects for now are:
- REV: reverb
- RMD: ring-modulation
- HRM: harmonizer
- FLW: following
- FLG: flanger
- PHS: phaser
and then adjusting the values of the parameters associated with the effect.
The values of the parameters in the control
knobs (knob) can be set both offline and in realtime (invalue), whereas
those in the red rectangular frame refer to the output values (outvalue) that
have been specified, during the setting, for the control panel of the effects (Effects
time-kontrol).
h. Effects time-kontrol
In the current release, in the absence of a time-line, you can plan in advance the onset of the effects you want to hear during the performance. You can do this by using the control panel (Effects time-kontrol). It is located below the main window (scroll down the i/o menu to view it).
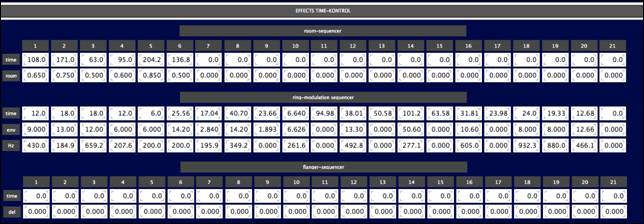
This data must be set before turning on SOLO_MV, and it can be saved as a preset through using the appropriate window:
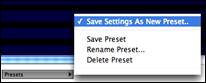
i. Enable execution
Clicking the “Play/Stop” button will turn the indicator light on and activate the algorithm:
![]()
Let's see what happens in the code. The Button Score Event will light up in 0.1 seconds which tool that will be used:
gk_trigger	init	0

instr PLAY

gk_trigger	=	1 - gk_trigger	; trigger

; To then decide which tool (and hence which version) will be active
if		gi_play	==	0	then
kinsnum	=	1000
kdur		=	.1
elseif	gi_play	==	1	then
kinsnum	=	1
elseif	gi_play	==	2	then
kinsnum	=	2
elseif	gi_play	==	3	then
kinsnum	=	3
elseif	gi_play	==	4	then
kinsnum	=	4
elseif	gi_play	==	5	then
kinsnum	=	5
elseif	gi_play	==	6	then
kinsnum	=	6
endif

gk_PLAY	=	gk_trigger	; led
kwhen		=	0
schedkwhen	gk_trigger, -1, 1, kinsnum, kwhen, gi_dur+i(gk_cdwn)
turnoff

endin
With the value of gi_play = 1 the instr
PLAY will activate, in this case, instr 1 which will then invoke (with the schedule) the actual algorithm (Technical set-up) with all controls set for Version I.
The following is the code for the Technical set-up, which is the heart of the algorithm:
instr setup			; TECHNICAL_SET-UP

if gk_trigger != 0 goto cont
turnoff
cont:

; RM AND IMPLEMENTING conditional branch
amod	oscili	gk_aRM, gk_fRM, gi_RM
if	gk_RM * gkrm	==	0	kgoto noRM
a1		=	gasig * amod
goto		vai
noRM:
a1		=	gasig
vai:

; Flanger and conditional branch EXECUTORY
adel	oscili .001, .36, gi_flg
if gkflg == 0 kgoto noflanger
a1 flanger 0.85 * a1 , 0.01 + adel, .25
noflanger:

;ASSISTANT_1 - LEFT & RIGHT	-	MICROPHONE
gkenl1	port gk_enl1, gi_htim1
gkenr1	port gk_enr1, gi_htim1

al_A	=	a1 * gkenl1	; signal left with envelopes (slider)
ar_A	=	a1 * gkenr1 ; right signal with envelopes (slider)

; ATTENUATION OF AMPLITUDE SIGNAL BEFORE THE DELAY-LINE
igain_A	=	.8
gk_tmdel	port	gk_tdel, gi_htim2

;ASSISTANT_2 - LEFT	-	FEED-BACK
gkenl2	port gk_enl2, gi_htim1
idlt		=	p4
adummyl	delayr 	idlt
adel_A	deltapi	gk_tdel
		delayw 	(al_A + (adel_A * gkenl2)) * igain_A

; ASSISTANT_2 - RIGHT	-	FEED-BACK
gkenr2	port gk_enr2, gi_htim1
;outvalue	"ass_02_R", gkenr2
adummyr	delayr 	idlt
ader_A	deltapi	gk_tdel
		delayw 	(ar_A + (ader_A * gkenr2)) * igain_A

;ASSISTANT_3 - LEFT & RIGHT		-	PLAY-BACK
gkenl3	port gk_enl3, gi_htim2
gkenr3	port gk_enr3, gi_htim2

aout_L	=	adel_A * gkenl3	; left signal with envelopes (slider)
aout_R	=	ader_A * gkenr3	; right signal with envelopes (slider)

;OUT
aklev		=		gasig * gklev_a1 * gkDM
ga_left	=		ga_left + aout_L + aklev
ga_right	=		ga_right + aout_R + aklev

endin

instr		output		; GENERAL OUTPUT

if gk_trigger != 0 goto cont
turnoff
cont:
aL		sum		ga_left, garevoutL
aR		sum		ga_right, garevoutR
		outs		aL*gk_main, aR*gk_main
		clear		aL, aR
		endin
The code is represented by the following flowchart:
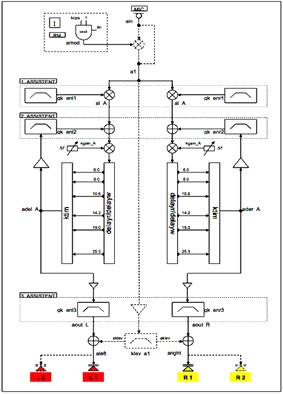
Diagram of Tecnichal set-up (refer to the version I)
j. Stop/Pause
To turn the algorithm off, click the appropriate (stop) button in MacCsound, at the top right of i/o,
![]()
or, alternatively,
type the key combination cmd-R .
To pause the algorithm click the pause button in the top right of i/o:
![]()
To put the algorithm to sleep without stopping it (this will allow you to set another Version), click the Play/Stop button again to reset the interface and all the parameters, then press the Play/Stop button once more.
![]()
k. Other options
Partial execution of the piece
During the setting (thus, with the algorithm turned on), by selecting an option from the drop-down Menu:
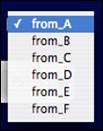
it is possible to start the performance at the beginning of a given cycle of the piece (A, B, C, D, E, F). This function is very useful in the study phase, since it allows the performer to avoid repeating the entire piece when they wish to rehearse only a portion of it.
At the code level, Csound will apply an offset to the values of action-time in the various instruments of the orchestra like this:
if	i(gk_cicle)		==	0 then
i_Ccl	= p4
elseif i(gk_cicle)	==	1 then
i_Ccl	= p5
elseif i(gk_cicle)	==	2 then
i_Ccl	= p6
elseif i(gk_cicle)	==	3 then
i_Ccl	= p7
elseif i(gk_cicle)	==	4 then
i_Ccl	= p8
elseif i(gk_cicle)	==	5 then
i_Ccl	= p9
endif
or in other cases of conditional branches in the call of the instruments, which will allow the program to start from the chosen Cycle.
IV. Useful tools for the One-man-performance
a. Metronome
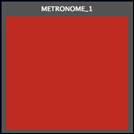
The two metronomes are made with "pulsing" meters.
- the first (metronome_1), in red, denotes the scanning time of each period:
- the second (metronome_2), in white, denotes the scanning time of all the pulses (beat) within the period:

b. Cycles & Periods progression
The monitoring instrument consists of six horizontal meters in various colors. The meters graphically display the passage of physical time within the respective Periods of each Cycle (A, B, C, D, E, F):

In turn, each meter is supported by the following text boxes:
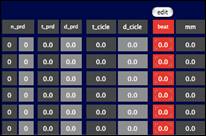
for the display of the following controls:
- n_prd: number of the current Period (dark gray box) and total number of Periods per Cycle in the uploaded Version (light gray box);
- t_prd: time elapsed for the current Period;
- d_prd: duration of each Period, for Cycle, in the charged Version;
- t_Cicle: time elapsed for the current Cycle;
- d_Cicle: duration of each Cycle in the uploaded Version;
- beat: management of the number of beat for Period (see above) - a red box;
- mm: value metronome (MM) of the scanning speed of the beats.
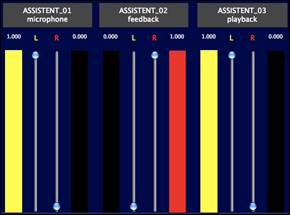
c. Assistants [1, 2, 3]
The movements of the sliders of the first three Assistants are arranged in stereo pairs (2+2+2)–for a total of six sliders. They are complemented by six pairs of meters (yellow for the L channel and red for the R channel) together with the related text boxes display the active value of their channels:
d. Delay-line [Assistant 4]
A knob (potentiometer) shows the tap delay-line value in seconds at any given moment (we have a single interface switch as the taps are the same for both channels L/R). For example, the values of time delay taps in seconds, used for Version I, in order of execution will be: 6, 14.2, 19, 25.3, 10.6, 8.

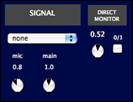
e. Management of the signal [Signal]
In addition to the choice of the input signal (with pull-down menu), we have:
- a potentiometer to increase the mic input (mic)
- a Direct-monitor (output signal) that can be varied in amplitude or excluded
- a potentiometer for the general volume management (main)
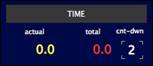
f. Time management [Time]
The monitoring is done through:
- timing of the current Version (actual)
- total time planned for the chosen Version (total). The value in seconds is set automatically after the choosing the Version
- count-down dedicated to the performance in real-time (see above)
g. Performance message
This text box is used to display, synchronistically with a cycle change, text indexes that are essential to the performer. It can also be used as an aid during improvised or "a memoria" performances. At present, this text box value is set within the orchestra using the following code:.
outvalue "message", Svalue

V. Performance Configuration
Currently, the algorithm runs regularly on my Mac notebook that has these characteristics:
- Operating System: OS X 10.4.11
- Processor: 1.67 Ghz PowerPC G4
- Memory: 1.5 Gb DDR2 SDRAM
Here are the Options settings for MacCsound used to minimize the waste of resources:
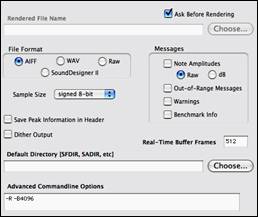
sr		=	44100
kr		=	100
ksmps		=	441
nchnls	=	2
VI. Diagram of the code
Below, the operation of the entire algorithm (SOLO_MV) is summarized through this list of active instruments. On the next page, it is also summarized with a flowchart.
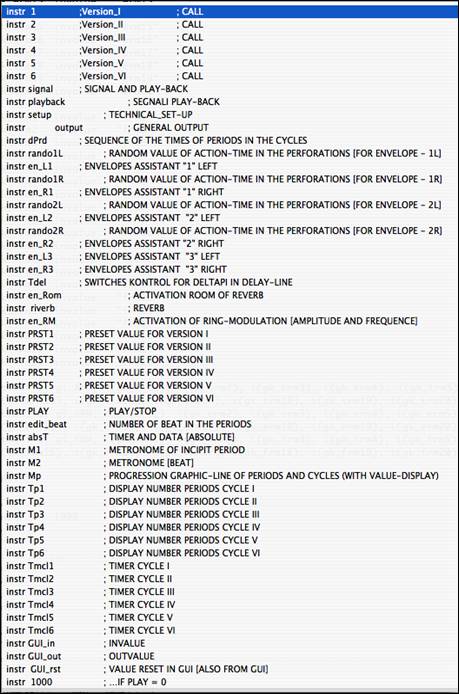
DIAGRAM-CODE OF SOLO_MV
CONCLUSION
Through my experiences in public live performances of "Solo", SOLO_MV_10.1 has proven to be an indispensable tool for the realization of this composition by K.Stockhausen within a digital setting. The algorithm can be easily set to one of six versions to run and, among other controls, it offers: a graphical interface for managing the parameters before and during the performance, the possibility to activate the perforations, handling some of the effects and the chance to try the piece from the beginning of each of six cycles.
Unlike other similar digital implementations written with Max/MSP, Kyma, etc., this patch makes use of free software (Csound and MacCsound). This piece can also be easily adapted for use with the cross-platform Csound frontend QuteCsound, making some simple changes to the code. Future plans for SOLO_MV_10.1 include:
- to provide the algorithm of a control that allows the player to be able to set an execution speed lower than the default; this can be another valuable aid to the soloist during study of the work
- to complete the algorithm with some command lines that also meet the dynamic and timbre demands that appear in the line of the third assistant for the Form-Schema
- to re-write the code of the algorithm for other free frontends (i.e. QuteCsound).
References
Bibliography
Antongirolami, G./Giordani, E. – K. STOCKHAUSEN – «SOLO» (for SASSOFONO and WORKSTATION KYMA/CAPYBARA – 66), “La terra fertile” - 1988, L’Aquila (Italy), Istituto Gramma pp. 14-17.
Bagnasco F. – KARLHEINZ STOCKHAUSEN – SOLO, SuonoSonda N. 7 “Web&hubs” pp. 80-87 – Edizioni Joker 2009 (Italy).
Bianchini, R./Cipriani, A. - IL SUONO VIRTUALE - ConTempo s.a.s. – Roma (Italy), 1998.
Esler, R. - DIGITAL AUTONOMY IN ELECTROACOUSTIC MUSIC PERFORMANCE: RE-FORGING STOCKHAUSEN University of California, San Diego - ICMC, 2006.
Maconie, R. – THE WORKS OF KARLHEINZ STOCKHAUSEN, Marion Boyars, London 1976.
Sluchin, B. – A COMPUTER-ASSISTED VERSION OF STOCKHAUSEN’S SOLO FOR A MELODY INSTRUMENT WITH FEEDBACK, Institut de Recherche et Coordination Acoustique/Musique (IRCAM) 1 Place Igor Stravinsky Paris F-75004, France sluchin@ircam.fr, in Computer Music Journal, 24:2, pp. 39–46, Summer 2000 © 2000 Massachusetts Institute of Technology.
STOCKHAUSEN 45, SOLO – SPIRAL (Stockhausen-Verlag, Kurten-Germany, 1995) - Notes from the CD booklet.
Stockhausen, K. – SOLO NR.19,
FÜR MELODIEINSTRUMENT MIT RÜCKKOPPLUNG, (Universal Edition-Wien) UE 14789
(1969).
Audio Sources
STOCKHAUSEN 45, SOLO – SPIRAL (Stockhausen-Verlag, Kurten-Germany, 1995) - CD
STOCKHAUSEN, K. – SOLO, version
for contrabbass: F.Bagnasco (F.Bagnasco cb) - SuonoSonda N. 7 “Web&hubs” –
Edizioni Joker 2009 (Italy) - CD
Essential Sitography
- http://crca.ucsd.edu/~msp/software.html
- http://qutecsound.sourceforge.net/
- http://www.aimi-musica.org/files/XVII%20CIM%20Proceedings.pdf
- http://www.csounds.com/downloads
- http://www.csounds.com/matt/d+d.html
- http://www.csounds.com/matt/MacCsound.1.4b1.dmg
- http://www.myspace.com/enricofrancioni
- http://www.robertesler.com/
- http://www.suonosonda.it