Introduction
Csound has proven time and time again that it is not only extremely powerful, but also extremely versatile. One example of its versatility that is often overlooked is its ability to be used as a command line digital-signal-processor.
Much like how the command line utility Image Magick[1] can be used to generate and process image files, Csound csd files can be specifically designed for the sole purpose of processing audio files. The goal of this article is to present two working Csound FX processor models, discuss in detail every significant component, describe the reasoning for the designs, and demonstrate methods for solving the issues that arise when using Csound in this way.
I. Overview
The Command Line
A command line[2] is a text-based user interface. A user types in a sequence of letters, numbers and other symbols to instruct the computer to do a specific task. Many Csounders are familiar with at least one of the Csound graphical-user interface applications such as MacCsound[3] or Csound5GUI[4]. Applications like these are front end versions of the command line version.
csound [-flags] csdfile
csound [-flags] orchfile scorefile
The following example demonstrates how to render a Csound csd file at the command prompt:
$ csound -A -oblip.aif blip.csd
$ csound --help
Processing an Audio File
The syntax to process a user-specified audio file from the command is slightly more involved than just rendering a standard csd or orc-sco pair. Since these csd processors are generically designed, meaning that the file or files to be processed are unknown, the name of the input file must be supplied to Csound at the command prompt. The following example demonstrates processing a file named "input.aif" and outputting a file named "output.aif":
$ csound -d -A -ooutput.aif --omacro:Filename=input.aif BasicVerb.csd
If you are not used to using Csound in this manner, or have little experience with a command prompt, the syntax may look like a foreign language. The following list breaks everything down into single instructions, and describes their purpose:
$ This represents the command prompt. The prompt on you system will most likely look different. You do not need to type this.
csound This is the Csound application.
-d "suppress all displays"
-A "create an AIFF format output soundfile"
-o "fnam sound output filename" aka, the output name flag.
output.aif This is the audio file that will be created by Csound. If output.aif already exists, it will be overwritten.
--omacro:XXX=YYY "Set orchestra macro XXX to value YYY"
Filename This is the name of the input file that will be processed by BasicVerb.csd. This macro is specific to BasicVerb.csd, and is not part of the default Csound flags.
input.aif This is the audio file which will be processed.
BasicVerb.csd This is the fx processor csd file.
Preview Before you Write
Instead of writing to a file, you can send the audio directly to the digital-to-audio converter (DAC) and preview the results before committing the processed audio to a file. To do this, output to the DAC with -odac.
$ csound -d -odac --omacro:Filename=input.aif --omacro:Diffusion=0.5 FlexiVerb.csd
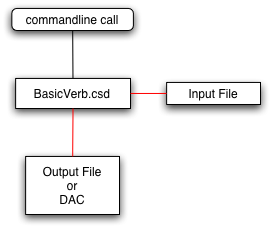
The Flow
This entire system of processing files can be broken into three generalized stages. The first stage involves executing Csound at the command prompt. During stage two, Csound processes an audio file. The third stage is the processed audio output file. In real world applications, these details can change. For example, the output might be several files.
Batch Processing with BASH
Many command line shells, such as the Bourne-again Shell (BASH), come with tools that can turn a Csound FX processor into a batch processor. Doing this requires a few more instructions at the command prompt. The following BASH commands show how to create a directory named ./outputDir/, process every AIF file in the current directory, and write the processed files to ./outputDir/.
WARNING: Use at own risk, as this method will overwrite any existing files of the same names in ./outputDir/.
$ mkdir outputDir
$ for i in *.aif ; do csound -d -A -o./outputDir/${i%.*}_fx.aif \
  --omacro:Filename=$i FlexiVerb.csd ; done
BASH is a common shell found on many linux and unix derivatives, including the Terminal.app in OS X. For users of Windows, Cygwin[5] offers much of the same functionality offered in many native *nix like operating systems.
II. BasicVerb - A Simple FX Processor Model
BasicVerb is a specially prepared csd file designed to process mono audio files specified by the user on the command prompt. Though BasicVerb lacks many useful features, it does contain all the necessary bare-bone elements required to be used as a fully functioning FX processor.
Flow
When Csound is executed, control of the file starts in the score. The score quickly passes control to theSetup instrument in the orchestra. Setup is responsible of initializing the FX engine. The Process instrument is started by Setup, adds reverb to the input file, and outputs a new file.
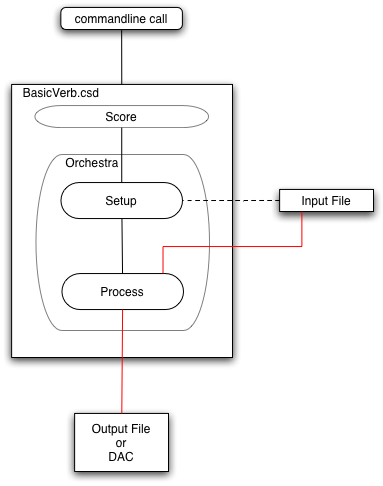
The Score Line
The score has the sole function of starting the FX processor. This is accomplished with a single score line that calls the Setup instrument. The rest of the work is handled exclusively by the orchestra.
i Setup 0 0.0001 ; Start processor
The duration of this call has been set 0.0001. The reason such a low duration is chosen is to reduce unnecessary muted space at the end of the output file.
Sample Rates and Channels
Since the standard sample rate of Red Book audio[6] is 44.1kHz, the decision to set BasicVerb's sr to 44100 seems natural. Since processing files is more about doing non-real-time work rather than real-time performance, setting kr to 44100 makes sense as it will produce the best audio quality when k-rate signals are used.
sr     = 44100
kr     = 44100
ksmps  = 1
nchnls = 1
There will be times when using a different sample rate other than 44.1kHz is preferable. Csound comes equipped with two flags, -r and -k, that allow the user to set the sample and control rates, avoiding the need to change the values of sr and kr in the orchestra header.
csound -d -A -ooutput.aif --omacro:Filename=input.aif -r 96000 -k 96000 BasicVerb.csd
Macro Parameters
Macro definitions are used to store the parameters of the FX processor. They are located near the top of the orchestra, and provide easy access for a user to make changes without having to dig through the code.
; Filename           # ??? #  ; Name of file to process.  Required parameter,
                              ; supplied by user at the command prompt call.

# define Amp         # 1.0 #  ; Scales final amplitude, in case of clipping.
# define Mix         # 0.5 #  ; Dry / Wet mix.  0.0 = Dry, 1.0 = Wet.
# define ReverbTime  # 1.0 #  ; Time of the reverb.
The downside to this implementation is that these macros are hardwired in the code. Csound's macro system does provide a solution that allow macros to be set by the user an the command prompt. See #ifndef.
Setup Instrument
The Setup instrument is the brain of the FX processor, as Setup's job is to prepare the Fx processor engine with all the necessary details. In this model, Setup calculates the duration of the output and turns on the Processor instrument. Setup does all of its work at initialization, and uses the turnoff opcode when finished.
One significant issue when designing a generic FX processor is that the duration of the input file can and will be different between uses. Another issue is that some digital signal processes will change the duration of the output file, such as a reverb tail.
Calculating the Duration
In order to solve the problem of the unknown file input duration, Setup and Process handle different tasks. Setup calculates the duration of the output file by getting the length of the input file and adding this with the reverb time.
ilength   filelen "$Filename"            ; Length of file in seconds
iduration =       ilength + $ReverbTime  ; Calculate duration of output file
Starting the Processor
Now that the duration is known, it is used in conjunction with the event_i to turn on the Process instrument.
event_i "i", "Process", 0, iduration
Processor instrument.Processor
If Setup is the brain, then Processor is clearly the heart. This is where the input file is transformed. Since Setup takes care of the logistics of making Csound work as a command line based FX processor, Processor is designed as if it were a typical Csound instrument.
Sample Rate and Pitch
The only significant issue at this stage is that a difference between the sample rate of the orchestra and that of the input file could cause a transposition of pitch. The diskin opcode accepts an optional parameter that alters the pitch of the file. To adjust for possible differences in samples rate, dividing the sample rate of the file by the sample rate of the orchestra will yield the proper ratio, correcting the pitch.
ifilesr filesr "$Filename"                ; Get samplerate of file
ain     diskin "$Filename", ifilesr / sr  ; Read file from disk
This method is a bit crude, as files with higher sample rates played back at lower samples rates may introduce audible aliasing[7] to the final product.
Output
Once the Csound job is finished, your freshly processed file is waiting for you to listen.
III. FlexiVerb - A Flexible FX Processor Model
FlexiVerb improves on the BasicVerb model by including a couple of features that improve flexibility for the user:
- Parameters can be set at the command prompt.
- The processor will accept both mono and stereo files.
Along with these additions comes a major design differences in the instrument model.
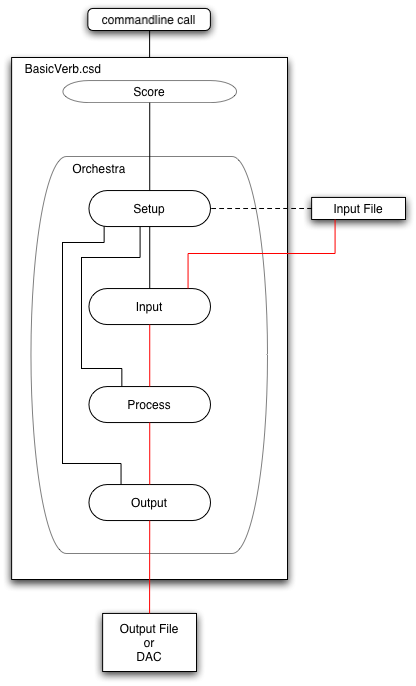
Flow
FlexiVerb's instrument model has extra complexity that allows the FX processor to accept both mono and stereo audio files. There are four instruments in this model: Setup, Input, Process and Output.
The score line is still the entry point to the FX processor, and does this by calling the Setup instrument. Setup has a more prominent role in the design as it is responsible for starting the other three instruments, routing the zak signals, and declaring f-tables to store the audio input file.
Stereo Output
FlexiVerb always outputs a stereo file, whether or not the input audio file is mono or stereo. Since it is a stereo reverb, nchnls is set to 2 in the header.
Parameters with #ifndef
With the help of the #ifndef, parameters are defined with a default value that can be overridden manually with the --omacro at the command prompt. FlexiVerb is equipped with six parameters. If they are not specified by the user at the command line, then their default values are used.
; Filename           # ??? #  ; Name of file to process.  Required parameter,
                              ; supplied by user at the command prompt call.


# ifndef Amp
# define Amp         # 1 #    ; Master amplitude
# end

# ifndef Mix
# define Mix         # 0.1 #  ; Dry / Wet mix.
# end

# ifndef Time1
# define Time1       # 1 #    ; Reverb time for left channel.
# end

# ifndef Time2
# define Time2       # 1 #    ; Reverb time for right channel.
# end

# ifndef Diffusion1
# define Diffusion1  # 0 #    ; High frequency diffusion for left channel.
# end

# ifndef Diffusion2
# define Diffusion2  # 0 #    ; High frequency diffusion for right channel.
# end
The following command call overrides the Mix parameter with the value of 0.2. The other four parameters will assume their default values.
$ csound -d -o./Output.aif --omacro:Filename=./Input.aif --omacro:Mix=0.2 FlexiVerb.csd
Mix parameter has the value of 0.2 instead of the default value of 0.1.Zak Bus
The instruments Input, Process, and Output require a method of passing and accepting audio between one another. The zak bus system was chosen for its simplicity and ability to reference channels by number. The following code initializes the two a-rate zak channels required to handle the stereo bus.
zakinit 2, 1
Setup
Setup has a hand in almost every task in this design model. The other three instruments are relatively simple in comparison.
Input File Information
In order for Setup to accomplish all of its various tasks, it must collect information about the audio input file. This information includes: the length of the file, the number of channels, the sample rate and number of samples.
ilength  filelen    "$Filename"    ; Length of file in seconds
inchnls  filenchnls "$Filename"    ; Number of channels
isr      filesr     "$Filename"    ; Sample rate of file
isamples =          ilength * isr  ; Number of samples in file, per channel
Calculating the Duration
In order to calculate the duration of the output file, the times of the reverbs are compared to one another to get the longer duration of the two. The longer duration is then added to the length of the input file. The following code demonstrations how this is accomplished using a conditional statement.iduration = ( $Time1 > $Time2 ? $Time1 : $Time2 ) + ilength
F-tables
The diskin opcode is traded out in favor of pre-loading the audio file into one or two f-tables. The reason for such a radical design change is because diskin is limited in the way it can stream files from disc. It can load either the left channel or the left and right channels, but not the right channel by itself.
Since f-tables can be generated dynamically, specifiable by a number, and can be read one at a time, they work perfectly with this model. Though you should be aware of two issues. First, since FX processors are generically programmed to handle files of any size, the size of a file is always unknown when executed. Second, tables require their memories to be declared as a size of a power-of-two or a power-of-two plus one.
At this point in the Setup instrument, the length of the audio file is known. See Input File Information. The next thing to do is to calculate the size of the table or tables that are to be generated. The following loop code continually doubles isize until the value is greater than the number of samples, per channel, in the audio input file.
isize = 1
repeat:
    isize = isize * 2
if( isize < isamples ) goto repeat
isize = isize + 1
Conditional Branching: Mono or Stereo?
Anif conditional branch is used to execture the proper block of code based on whether the input file was mono or stereo.
if( inchnls == 2 ) igoto inputStereo
For more information about conditional branching, read Steven Yi's articles[8,9] on conditional branching.
Loading a Mono Sample
For a mono file, only one table needs to be created. The ftgen opcode creates this single f-table at index one, and loads in the sample using the GEN 01 routine. An event for Input is generated. The third parameter is the length of time that the sample is to be played. Parameters four and five take arguments for which f-tables will be used for the left and right channel. Since a mono file is to be processed, both of these parameters are given f-table index 1.
inputMono:

    ; Load Sample into table

    gitemp ftgen 1, 0, isize, 1, "$Filename", 0, 0, 1


    ; Play Sample

    event_i "i", "Input", 0, ilength, 1, 1
event_i call to instrument Input.Loading a Stereo Sample
Two f-tables are created and then loaded with the contents of the stereo input file. The fifth parameter of theevent_i differs as it is passed f-table two, as it stores the contents of the right channel of the input audio file.
inputStereo:

    ; Load Sample into stereo table pair

    gitemp ftgen 1, 0, isize, 1, "$Filename", 0, 0, 1
    gitemp ftgen 2, 0, isize, 1, "$Filename", 0, 0, 2


    ; Play Sample

    event_i "i", "Input", 0, ilength, 1, 2
event_i call to instrument Input.Starting the Processor
Starting Processor is fairly straight forward, as it is akin to starting a typical zak based FX processor found in many Csound files.
event_i "i", "Process", 0, iduration
Starting the Output
The last item on Setup's list is to start the Output instrument, which is responsible for writing the audio to a file or to the DAC.
event_i "i", "Output", 0, iduration
Input
The Input instrument does two things. The first is to read the audio samples from the f-table or f-tables.
aphasor phasor 1 / idur
asig1   table3 aphasor * isamples, ifn1, 0
asig2   table3 aphasor * isamples, ifn2, 0
zaw asig1, 1
zaw asig2, 2
Process
The Process instrument reads audio from the two zak channels, sends them through the reverb2 opcodes, mixes the dry and wet signals, and writes the audio back to the two zak channels.
Output
The Output instrument is the final stage. It reads in the audio from the two zak channels, makes any adjustments to the volume, based on the Amp parameter, and sends the audio to the output file or DAC.
IV. And Beyond...
The two models and associated methods I have presented should help get you on your way to designing and implementing command line based Csound FX processors. Though the examples are merely rudimentary reverb units, they lay the basic foundation for which much more interesting FX units can be written. All of Csound's tools can be used at your discretion to invent whatever your imagination can come up with. Happy Csounding.Acknowledgments
I want to thank peiman for the inspiration for this article. He had originally asked the Csound mailing list[10] if it was possible to use Csound as a batch processor, which led to the development of many of the methods containted in this article. I would like to thank Andres Cabrera for suggesting in the same mailing list thread[11] about using the --omacro flag for passing parameters to Csound at the command prompt. I would also like to thank sand-6 for streamlining[12] the BASH batch processor instructions. Finailly, I would like to thank the editors James Hearon and Steven Yi for giving me an extra week to write this article during a very busy period of my life.
Best,
Jacob Joaquin
Files
CommandLineFX.zip - All the related files for this article.Links
Csounds.com - ... almost everything Csound.Csound Journal - Inspiration in Ezine form.
The Csound Blog @ Thumbuki - The Csound Blog is a collection of journals that are distributed within unified Csound csd files.
Thumbuki.com - The Cosmos in 20 Words or Less.
References
[1] Image Magick. http://www.imagemagick.org/script/index.php[2] Command Line Interface @ Wikipedia. http://en.wikipedia.org/wiki/Command_line_interface
[3] MacCsound. http://www.csounds.com/matt/MacCsound/
[4] Csound5GUI. http://csound.sourceforge.net/
[5] Cygwin. http://www.cygwin.com/
[6] Red Book @ Wikipedia. http://en.wikipedia.org/wiki/Red_Book_Audio
[7] Nyquist frequency @ Wikipedia. http://en.wikipedia.org/wiki/Nyquist_frequency
[8] Control Flow - Part I by Steven Yi. http://www.csounds.com/journal/2006spring/controlFlow.html
[9] Control Flow - Part II by Steven Yi. http://www.csounds.com/journal/2006summer/controlFlow_part2.html
[10] Csound Mailing List: Batch processing audio-files with csound(?) by peiman. http://www.nabble.com/Batch-processing-audio-files-with-csound%28-%29-p11479592.html
[11] Csound Mailing List: Batch processing audio-files with csound(?) by Andres Cabrera. http://www.nabble.com/Re%3A-Batch-processing-audio-files-with-csound%28-%29-p11479708.html
[12] Csound Mailing List: Batch processing audio-files with csound(?) by sand-6. http://www.nabble.com/Re%3A-Batch-processing-audio-files-with-csound%28-%29-p11482858.html