Live Csound
Using Csound as a Real-time Application in Pd and CsoundQt
Joachim Heintz
jh AT joachimheintz.de
Introduction
During the Linux Audio Conference (April 12-15, 2012 at Stanford University) I gave a presentation and a workshop on using Csound in a real-time context. Here, I will try to put the main points together, from a perspective which is more focused on Csound users than it was at LAC. Although I am writing here about live Csound in PD and CsoundQt, some of the tips may be useful for people using Csound in Max, Ableton Live or in iOS/Android applications.
I. Live Csound?!?
The Csound paradigm
Csound was not designed for real-time use. It provides a simple way of triggering events in a musical timeline. The model is a classical orchestra which performs a piece: each instrument in the orchestra knows when to play from the score, which provides all necessary information about the start and the duration of a note. Information about the volume or any other determinations may also be part of the score.
Using Csound in a live context can be considered as replacing the score by actions of the performer. It is now (s)he, who triggers the events (= calls any instrument) directly, via a mouse click, hitting the space bar of the computer keyboard, using a MIDI keyboard or any other external device.
As a fixed timeline is obsolete for a live performance, it usually serves the purpose of turning Csound on[1], or setting up a few "always on" instruments.
Instruments and their occasionally special behavior
Instruments are the main building blocks in Csound. For a good design of Live Csound, it is important to decide which task should be assigned to which instrument. If an instrument is to receive any control message, like MIDI or OSC, it usually has to be always on for listening. If a trigger signal is received and another instrument is turned on, which may just flash some light in the GUI, or set some value [2], the called instrument should be turned off immediately after having done its job.
It is crucial for this design to understand one idiosyncrasy of
Csound instruments which is not always transparent, even for
experienced Csound users: the difference between the initialization
and the performance pass[3]. In short,
this means once an instrument is called, all i- and k-variables[4] are initialized. While the i-variables stay as they are, the
k-variables will be updated in every performance cycle, i. e. every ksmps samples. The code example below shows the use of i- and k-variables.
<CsoundSynthesizer>
<CsOptions>
-odac
</CsOptions>
<CsInstruments>
sr = 44100
ksmps = 44100

  instr Incr_i
          prints    "\nEXAMPLE FOR AN i-VARIABLE\n"
iStart    =         iStart + 1
          prints    "iIncr = %d\n", iStart
  endin

  instr Incr_k
          prints    "\nEXAMPLE FOR A k-VARIABLE\n"
kStart    =         kStart + 1
          prints    "Value of kStart at init-pass = %d\n", i(kStart)
          printks   "kIncr = %d\n", 0, kStart
  endin
</CsInstruments>
<CsScore>
i "Incr_i" 0 5
i "Incr_k" 5 5
</CsScore>
</CsoundSynthesizer>
Both, iStart and kStart are set to zero in the init pass, because no explicit value has been
given. (This could have been done by the opcode init.)
Both instruments run for five seconds. But in the first instrument
(Incr_i), nothing happens during the performance loop to
the i-variable iStart.
It is just incremented once, by the statement iStart =
iStart + 1. The second
instrument, however (Incr_k), increments variable kStart once every control cycle because of the statement kStart =
kStart + 1. Because the ksmps has been set here to 44100, and the sample rate (sr) equals 44100, one control cycle happens just once a
second, and kStart is
incremented five times in five seconds.
The next example is pretty close to a
typical live situation. It is meant for CsoundQt. The channel show should reveal a display as in Figure 1, below.
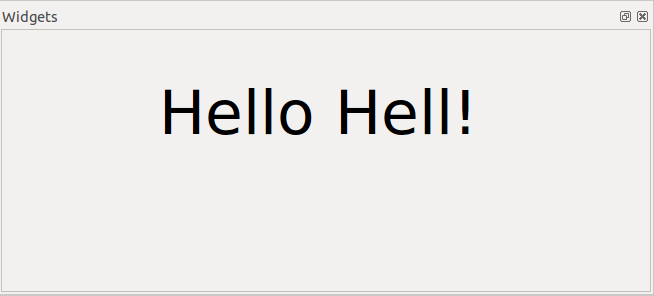
Figure 1. Display from CsoundQt.
... or as in Figure 2, below:
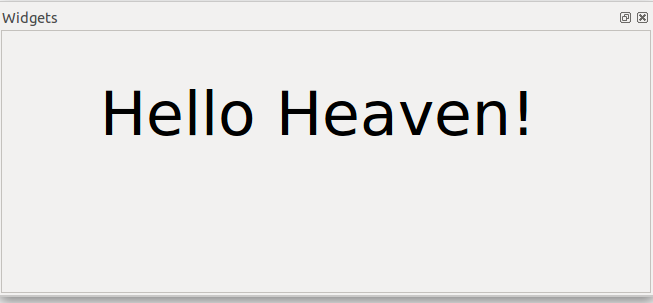
Figure 2. Alternate display from CsoundQt.
For another example, say you want to show the message Hello Hell for one second, followed by the message Hello Heaven. You could try it with this instrument, shown in the code example below.
<CsoundSynthesizer>
<CsOptions>
-odac
</CsOptions>
<CsInstruments>

;the conflict
instr Show1
outvalue "show", "Hello Hell!"
endin

instr Show2
outvalue "show", "Hello Heaven!"
endin

</CsInstruments>
<CsScore>
i "Show1" 0 10
i "Show2" 1 9
</CsScore>
</CsoundSynthesizer>
The result of this is a state of
limbo after one second. Your display should show a flipping image,
switching randomly between the two messages. The reason is that
instrument Show1 does
not stop sending its message "Hello Hell" to the widget,
while instrument Show2 starts sending "Hello Heaven" after one second. There is
a conflict, and moreover both instruments are misused in respect to
performance aspects because the channel need not be set to the new
value more than once. It is not useful to send the string in every
k-cycle, if the value has not been changed. The solution is to
immediately turn off the instruments after they have set their string
value to the software channel show in the first k-cycle, as shown in the code example below.
<CsoundSynthesizer>
<CsOptions>
-odac
</CsOptions>
<CsInstruments>

;the solution
instr Show1
outvalue "show", "Hello Hell!"
turnoff
endin

instr Show2
outvalue "show", "Hello Heaven!"
turnoff
endin

</CsInstruments>
<CsScore>
i "Show1" 0 10
i "Show2" 1 9
</CsScore>
</CsoundSynthesizer>
An even more efficient solution, however, is also somehow a paradox. The value to the software channel can be sent at the init-pass. Thus the instrument can be turned off before the first performance pass, shown in the code example below.
<CsoundSynthesizer>
<CsOptions>
-odac
</CsOptions>
<CsInstruments>

;the paradox solution
instr Show1
printks "I will be printed!\n", 0
turnoff
printks "I will not be printed!\n", 0
outvalue "show", "Hello Hell!"
endin

instr Show2
printks "I will be printed!\n", 0
turnoff
printks "I will not be printed!\n", 0
outvalue "show", "Hello Heaven!"
endin

</CsInstruments>
<CsScore>
i "Show1" 0 10
i "Show2" 1 9
</CsScore>
</CsoundSynthesizer>
The printks statements are only present to prove that turnoff indeed terminates the performance of the instrument. The example
works because the software channel show is set to the
string "Hello Hell" and respectivley "Hello Heaven" at the
init-pass of the instrument which has been triggered. This is the
best method to employ if anything is to be done just once - which is frequently
the case in live situations. We will come back to this topic later
in this article. You can download all the code examples for this article, Heintz_examples.zip, here.
Some general pointers for live Csound
-
Use different instruments for the different jobs which are to be done in your live configuration. Use the init-pass of an instrument for setting values whenever possible, and turn off any instrument as soon as its job is done. Split jobs if the instrument becomes too complex. Use User-Defined Opcodes (UDO's) and macros to modularize your code.
-
Tweak the performance and the latency with the vector size (
ksmps) and the buffer size settings using the command line flags-B, and-b. -
Avoid some opcodes which are not intended for real-time use.
-
For example, do not use the old pv opcodes for Fourier transform / phase vocoding, like
pvocorpvcross. Use the pvs opcodes instead (pvsvoc, orpvcscross, etc). -
For another example, do not use opcodes for convolution which are not meant for real-time performance, like
convolveordconv. Usepconvolveorftconfvinstead.
II. Live Csound in Pd
Combining Csound's DSP power with Pd's flexibility and interfacing abilities is a really nice idea, both for Csound and Pd users. Victor Lazzarini's csoundapi~ external for Pd offers this connection. Installation instructions and examples for the use of csoundapi~ can be found in the Csound FLOSS Manual[5].
The main example given here, and below in the section about CsoundQt, implements a polyphonic pitch shifter.
Building a four voice transposition instrument
In this example, audio from a microphone is received by Pd and passed to Csound which then creates the four voice transposition, which is then sent back to Pd as a stereo mix. Csound implements these transpositions by first converting the received audio into a frequency domain signal and then creating the four pitch-shifted signals. These four signals are converted back into the time domain and panned and mixed to create a stereo output. This stereo signal is finally passed back into Pd which in turn sends it to the speakers as shown below in Figure 3.
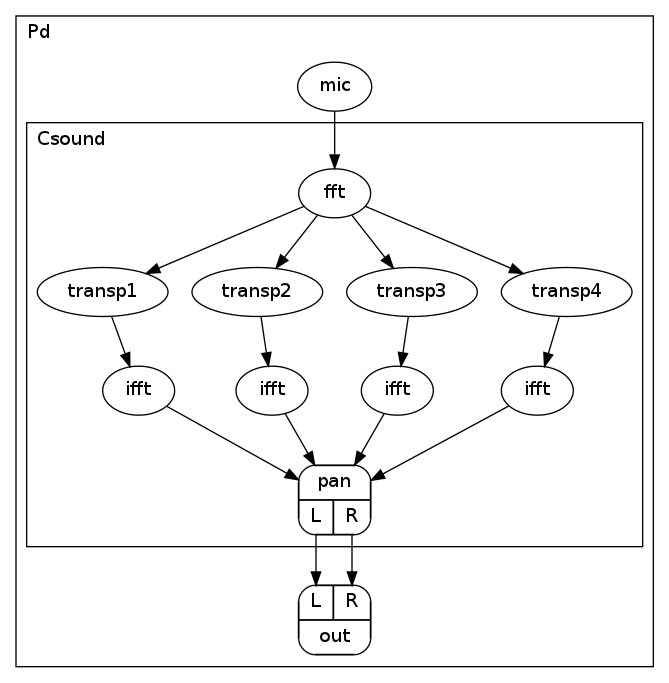
The related Csound file is very simple, and is shown below.
<CsoundSynthesizer>
<CsInstruments>
sr = 44100
ksmps = 32
nchnls = 2
0dbfs = 1

  instr transp
 ;input from pd
aIn       inch      1
 ;transform to frequency domain
fIn       pvsanal   aIn, 1024, 256, 1024, 1
 ;transposition
fTransp1  pvscale   fIn, cent(-600)
fTransp2  pvscale   fIn, cent(-100)
fTransp3  pvscale   fIn, cent(200)
fTransp4  pvscale   fIn, cent(500)
 ;back to time domain
aTransp1  pvsynth   fTransp1
aTransp2  pvsynth   fTransp2
aTransp3  pvsynth   fTransp3
aTransp4  pvsynth   fTransp4
 ;panning
aL1, aR1  pan2      aTransp1, .1
aL2, aR2  pan2      aTransp2, .33
aL3, aR3  pan2      aTransp3, .67
aL4, aR4  pan2      aTransp4, .9
aL        =         (aL1+aL2+aL3+aL4)/3
aR        =         (aR1+aR2+aR3+aR4)/3
 ;output to pd
          outs      aL, aR
  endin

</CsInstruments>
<CsScore>
i "transp" 0 99999
</CsScore>
</CsoundSynthesizer>
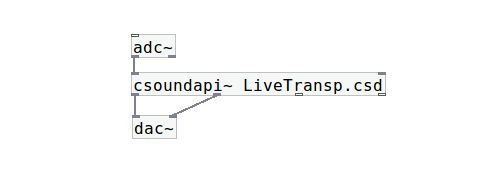
The whole Pd patch is shown below in Figure 4.
Sending and receiving control data
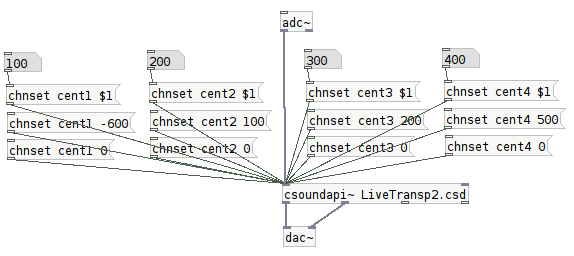
For a fuller interaction between Pd and the embedded Csound, it is normally desirable to also pass control signals between Pd and Csound. In Figure 5, below, the transposition values are controllable from Pd instead of being fixed.
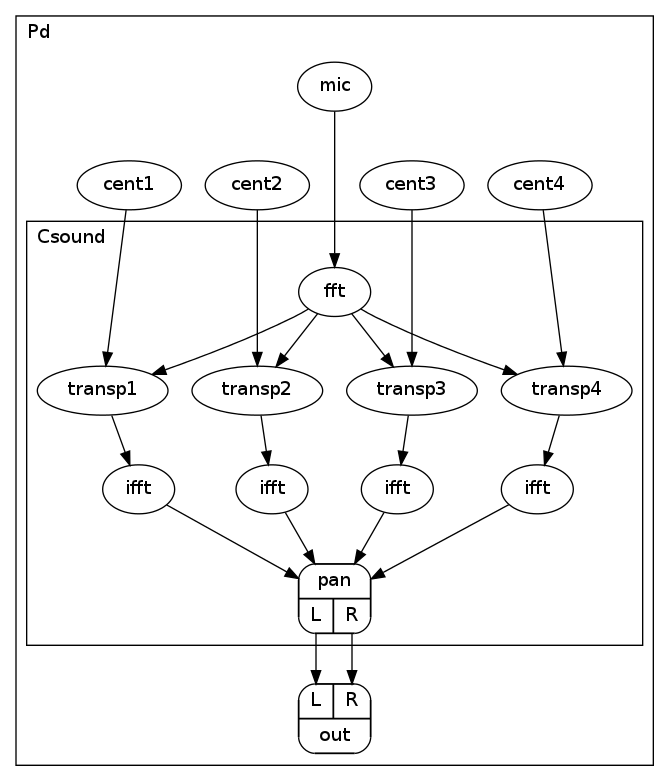
Figure 6, below, shows the Pd patch, using contollers to send values to Csound.
The "just once"-problem
It is worth having a closer look at what is actually happening in the example shown above in Figures 5 and 6. It looks easy, and it works, but actually two languages are communicating with each other in a strange way. In this case, they understand each other, but this is pure chance if the differences have not been understood by the user.
Pd differentiates between messages and audio streams. Messages are sent just once, while audio streams are sending data continuously, at the sample rate. Csound has no class for sending something in real time "just once". If something is sent as a control value to Csound, like the cent values in the example above, Csound considers this as a control signal; i. e. a continuous stream of control data.
In
this case, it works. Pd sends a new cent message just once, and
Csound interpretes this as a repeated control message. It works,
because the pvscale opcode needs a control-rate input. But if
the user wants to trigger something "just once", they have
to ensure that Csound does not repeat the message from Pd all the
time.
For a simple example, shown below in Figure 7, the user may want to trigger a short beep each time a message box with a '1' has been pressed.

Example code for the trigger and beep is shown below.
<CsoundSynthesizer>
<CsInstruments>
sr = 44100
ksmps = 32
nchnls = 1
0dbfs = 1

  instr master ;wrong!
kTrigger  chnget    "trigger"
 if kTrigger == 1 then
          event     "i", "beep", 0, 1
 endif
  endin

  instr beep
aBeep     oscils    .2, 400, 0
aEnv      transeg   1, p3, -6, 0
          out       aBeep * aEnv
  endin

</CsInstruments>
<CsScore>
i "master" 0 99999
</CsScore>
</CsoundSynthesizer>
A
master instrument would receive the data on the channel called trigger from Pd, and call a subinstrument beep each
time a '1' has been received. That is the wish of the user. But what
really happens? The kTrigger variable will always be set to
'1', because there is no other message coming from Pd, and so Csound
will trigger a beep not "just once", but once at each
control cycle, in this case 44100/32 times per second.
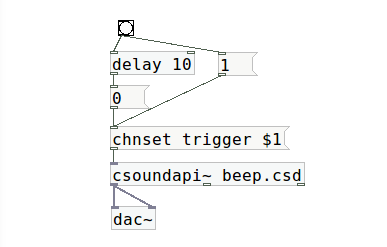
There are two ways of solving the problem here. The first one tweaks the context from the Pd side. Pd must send a '0', if the message box has not been pressed. The following patch, shown below in Figure 8, first sends a '1' and then after 10 milliseconds a '0' after hitting the 'bang'.
On the Csound side, just the first '1' received after any zeros should trigger a beep. Csound has to ignore the repetitions. This is done by the following code in the master instrument.
  instr master ;now correct
kTrigger  chnget    "trigger"
kNewVal   changed   kTrigger
 if kTrigger == 1 && kNewVal == 1 then
          event     "i", "beep", 0, 1
 endif
  endin
The
changed opcode returns '1' exactly in the control cycle when a
new value of kTrigger has been received. So the if-clause has
to ask whether both, kNewVal and kTrigger equal 1. In this case only the sub-instrument is to be triggered.
The second solution comes from the Csound side and solves the problem by simply calling the instrument via the Csound API. In this case, a Pd message with an instrument event can be sent directly to trigger a Csound instrument, shown below in Figure 9, and this is indeed done "just once" using a single mouseclick.
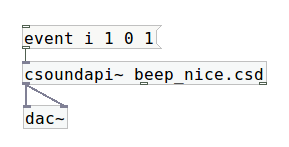
The nice_beep.csd code below does not employ a trigger since the Pd event message will start the instrument. This is the best division of tasks between Pd and Csound.
<CsoundSynthesizer>
<CsInstruments>
sr = 44100
ksmps = 32
nchnls = 1
0dbfs = 1

instr beep
aBeep     oscils    .2, 400, 0
aEnv      transeg   1, p3, -6, 0
          out       aBeep * aEnv
endin

</CsInstruments>
<CsScore>
e 99999
</CsScore>
</CsoundSynthesizer>
III. Live Csound in CsoundQt
CsoundQt[6] has been written and developed by Andrés Cabrera since 2008. It is now the most widely used front end for Csound. It uses the Qt toolkit[7] for building graphical user interfaces.
CsoundQt offers all necessary tools to work with live electronics in Csound, without using another host application, but if a user wants to use it for a live electronics piece, questions like the ones below may arise.
-
How can I see or show the input and output signals?
-
How can I dynamically change control values?
-
How can I work with presets or cues?
-
How can I route my audio signals in a flexible way, to provide mixing and to apply effects?
I will try to give some examples here which show possible solutions to these standard tools for CsoundQt's live electronic use. I will apply them mostly to the same example of the four voice transposing instrument as has been shown above for the use of Csound in Pd.
Displaying input and output signals
Metering audio signals is certainly a basic functionality of every live application. You will want to visualize the microphone signal going into your application. You will want to apply a gain to it, and see the result. These two signals are like the pre-fader and post-fader signals in a mixer or pre-amplifier. You may also want to see, for instance, the output of a transformed live signal, the output of a tape, or the signal of an electronic instrument. You will want to apply gain to those signals, and then view the master output signal.
You may look for a widget which meters and shows an audio signal,
like the meter~ object in Max or the VU object in Pd. There are none available in CsoundQt.
The first reason for this is that all widgets work at control rate, not at
the audio rate. As a result, you generally have to transform the audio
signal into a control signal. To visualize an audio signal, it is
sufficient to display 10-20 values per second; so using the opcode
max_k is probably the best choice. max_k returns the
maximum of an audio signal within a given time span. The only thing
you have to add is a trigger signal which determines the time
interval, shown in the code snippet below.
kTrigDisp metro	   10
kDispVal  max_k    aSig, kTrigDisp, 1
The kDispVal value can be
sent directly to a controller widget in CsoundQt. Give the output a green color, put
the code in a user defined opcode, add another UDO to display signals
above the limit - or simply copy the code from one of the existing CsoundQt
examples[8],
and you will have the functionality you need for metering. One day perhaps
someone will add a native meter widget to CsoundQt, but for now building one yourself is the best solution.
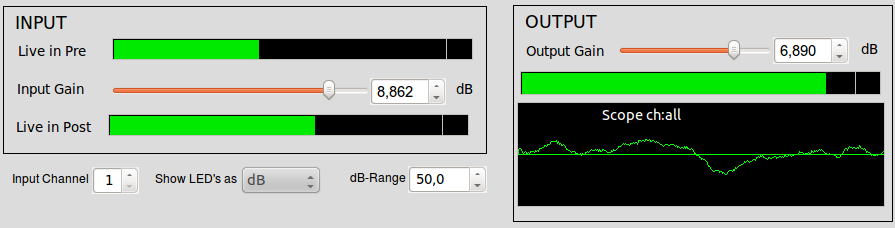
Figure 10. A custom CsoundQt metering widget.
Changing control values via software buses
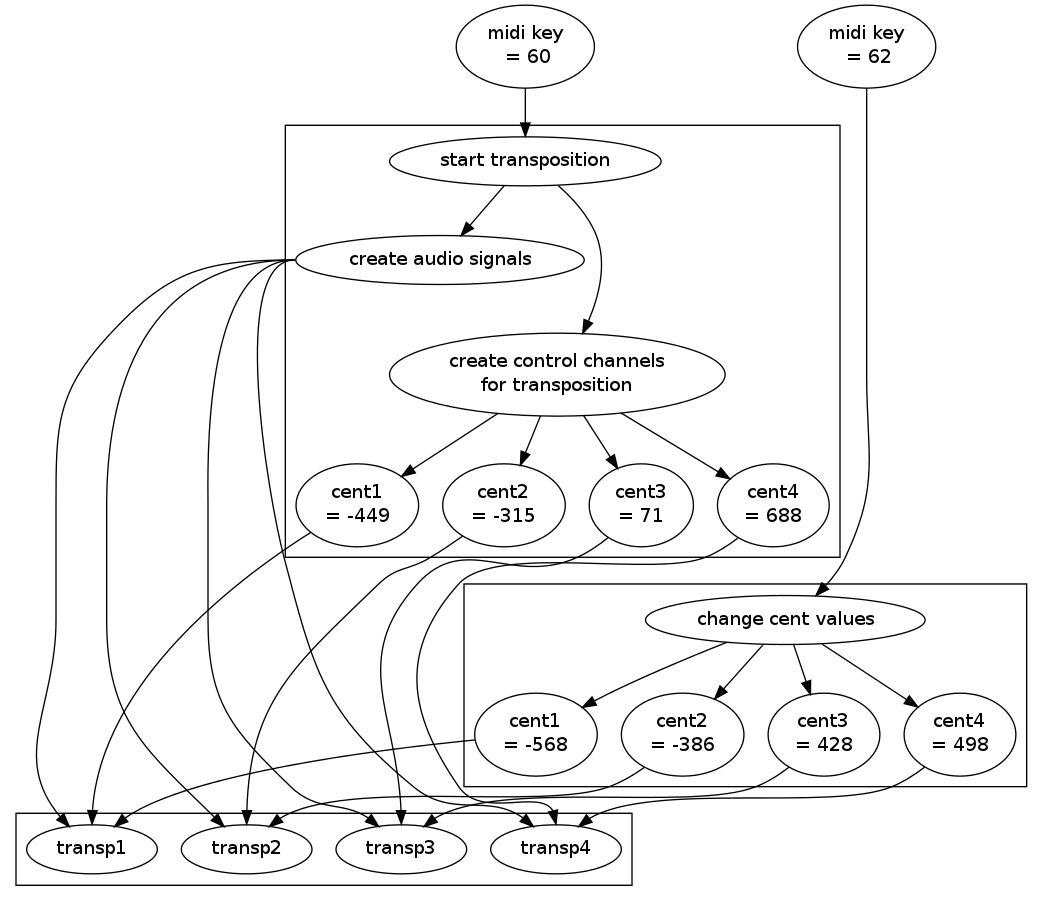
Many situations need a flexible interchange of control data. Suppose the user wants to transpose the live input of four voices using the cent values -449, -315, 71 and 688 for the first bar, and then in the next bar employ the cent values -568, -386, 428 and 498. For both events, activating the four voice transposition and changing the values, triggering is accomplished by employing two different MIDI keys; for instance MIDI keys 60 and 62.
This is a typical case for the use of internal software busses. Four audio signals are set. For each of the signals a software control bus is created, holding the transposition value. The first instrument sets the initial values. When the second instrument is triggered, the control busses are set to the new values. This scenario is shown below in the diagram in Figure 11.
This is the related Csound code for the four voice transposition instrument utilizing the software bus.
  instr set_transp
;create software busses
           chn_k      "transp1", 3
           chn_k      "transp2", 3
           chn_k      "transp3", 3
           chn_k      "transp4", 3
;set initial values
           chnset     -449, "transp1"
           chnset     -315 "transp2"
           chnset     71, "transp3"
           chnset     688, "transp4"
;receive the values from the software busses
kCent1     chnget     "transp1"
kCent2     chnget     "transp2"
kCent3     chnget     "transp3"
kCent4     chnget     "transp4"
;receive the live audio input
aLvIn      chnget     "live_in"
;perform fourier transform
fLvIn      pvsanal    aLvIn,1024,256,1024,1
;perform four voice transposition
fTp1       pvscale    fLvIn, cent(kCent1)
fTp2       pvscale    fLvIn, cent(kCent2)
fTp3       pvscale    fLvIn, cent(kCent3)
fTp4       pvscale    fLvIn, cent(kCent4)
;resynthesize
aTp1       pvsynth    fTp1
aTp2       pvsynth    fTp2
aTp3       pvsynth    fTp3
aTp4       pvsynth    fTp4
;add and apply envelope
aTp        =          aTp1+aTp2+aTp3+aTp4
kHul       linsegr    0,.3,1,p3-0.3,1,.5,0
aOut       =          aTp * kHul
;mix to global audio bus for live out
           chnmix     aOut, "live_out"
  endin

  instr change_transp
           chnset     -568, "transp1"
           chnset     -386, "transp2"
           chnset     428, "transp3"
           chnset     498, "transp4"
  endin
Routing and mixing audio streams
As can be seen from the example code above, the software buses are not just
used for control, but can also be used for audio signals. The live audio input
is
sent to a channel called live_in. The instrument set_transp gets the live input via the line of code shown below.
aLvIn chnget "live_in"
After processing, the live transposed signals are sent to an audio
bus called live_out. As other instruments may also send
audio signals to this bus, chnmix is used instead of chnset, as illustrated in the code example below.
chnmix aProcessed, "live_out"
If tape or synthesized sounds are also used, you will create another software channel which may be named "tape" or "synth". You can then mix the produced audio signals to the channel, and collect all the audio buses using an instrument such as the one shown in the code below.
  instr collect
;;LIVE
;collect live out signals
aLiveL     chnget     "liveout_l"
aLiveR     chnget     "liveout_r"
;apply gain
kOutGain   invalue    "liveoutgaindb"
aLiveL     =          aLiveL * ampdb(kOutGain)
aLiveR     =          aLiveR * ampdb(kOutGain)
;write out
           outch      1, aLiveL, 2, aLiveR
;display
           ShowLED_a  "liveoutL", aLiveL, gkLedTrig, 50
           ShowLED_a  "liveoutR", aLiveR, gkLedTrig, 50
           ShowOver_a "liveoutoverL", aLiveL, gkLedTrig, 1
           ShowOver_a "liveoutoverR", aLiveR, gkLedTrig, 1
;clear software channels
           chnclear   "liveout_l"
           chnclear   "liveout_r"
;;TAPE
;collect all "tape" audio signale
aTapeL     chnget     "tape_l"
aTapeR     chnget     "tape_r"
;write out
           outch      1, aTapeL, 2, aTapeR
;display
           ShowLED_a  "tapeoutL", aTapeL, gkLedTrig, 50
           ShowLED_a  "tapeoutR", aTapeR, gkLedTrig, 50
           ShowOver_a "tapeoverL", aTapeL, gkLedTrig, 1
           ShowOver_a "tapeoverR", aTapeR, gkLedTrig, 1
;clear channels
           chnclear   "tape_l"
           chnclear   "tape_r"
  endin
It is important to clear the software channel at the end (or the
beginning) of the instruments used, if you work with chnmix, otherwise samples from the current control block will be kept for the
next control block, resulting in an ugly tone with a frequency of sr/ksmps Hz. Software channels are the solution to many different situations in
programming live electronics, such as mixing, routing, and the interchange of
values. The chn opcodes offer
a flexible and reliable system to work with those concepts in Csound.
Presets and Cues
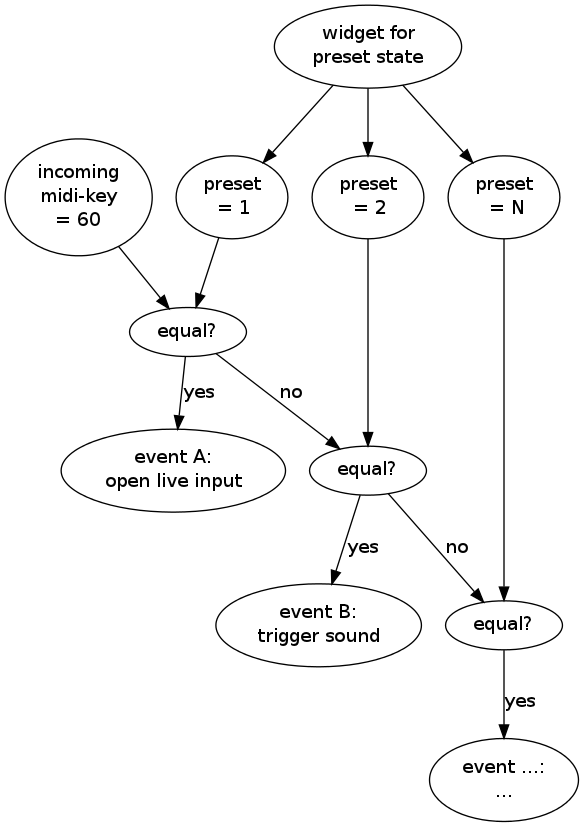
A preset is a general configuration in a live electronic application which defines the meaning of certain input signals within the context of that preset environment. For instance, if the MIDI key number 60 has been pressed in the context of preset 1, it may mean "open the live input and employ a fade in". If the same key has been pressed in preset 2, it may mean something totally different, for instance "play a percussive sound".
As CsoundQt has native widgets, these widgets can be used to represent a preset[9]. Csound will then look at the value of this widget, and will decide what to do given a certain MIDI input. A diagram of this general scheme is show below in Figure 12.
As "triggering an event" in Csound usually means
"calling an instrument", the Csound code using the event_i opcode for performing that instrument
is shown below.
 instr MIDI_receive ;getting the MIDI note number
iNotNum    notnum
;getting the actual preset number
iPreset    =          i(gkPreset)
;bindings for preset 1
 if iPreset == 1 then
  if iNotNum == 60 then
           event_i "i", "live_fade_in", 0, 1
  elseif iNotNum == ... then
           event_i    ...
  endif
;bindings for preset 2
 elseif iPreset == 2 then
  if iNotNum == 60 then
          event_i "i", "trigger_sound", 0, 1
  elseif iNotNum == ... then
           event_i    ...
  endif
;bindings for preset ...
 elseif ...
 ...
 endif
  endin
The gkPreset variable which holds the status of the preset
given by the preset widget, is created in an "always on"
instrument. This instrument should be the first of all the
instruments in the score[10],
and its definition should contain a line such as the code shown below where "preset"
is a string which defines the name of the widget's channel.
gkPreset invalue "preset"
By including code such as above, the current preset state is received from the
spin box
widget of CsoundQt, and sent as the global variable value gkPreset to each
instrument. The widget itself can be changed by the user either via
the GUI or via any input event; for example a reserved MIDI note for
increasing, and another MIDI note number for decreasing the preset number.
Assuming the reserved MIDI note for increasing is 72, and for
decreasing 48, the code for changing the preset values is shown below[11].
if iNotNum == 72 then
           outvalue   "preset", iPreset + 1
elseif iNotNum == 48 then
           outvalue   "preset", iPreset - 1
endif
The method proposed here for handling presets offers the user thorough
flexibility. All events are embedded in instruments which are
triggered if a MIDI key is received in the context of a particular preset. General conditions for a new preset can be set in a similar
way as shown in the code below employing the changed opcode. For
instance, if the live microphone input is to be open at the beginning of
preset 1, but closed at the beginning of preset 2, then the code in the
master instrument could be written like that shown below.
gkPreset  invalue   "preset"
kNewPrest changed   gKPreset
 if kNewPrest == 1
  if gkPreset == 1 then
kLiveVol  =         1 ;mic open
  elseif gkPreset == 2 then
kLiveVol  =         0 ;mic closed
  endif
 endif
Performance tweaks
Csound's performance for live applications depends mainly on its
vector and buffer sizes.
As mentioned above, the ksmps constant
defines the internal vector size. A value of ksmps=32 should be
adequate for most live situations. The software and hardware buffer
sizes must not be kept at Csound's defaults, but should be set to
lower values to avoid audio latency[12]. CsoundQt offers an easy way to adjust the Buffer settings in the configuration
panel.
Nominal input values are shown below in Figure 13.
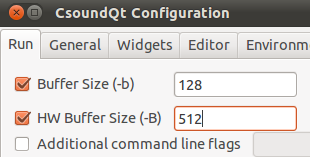
Figure 13. Nominal values for Csound Buffers.
In the most recent versions of Csound[13], the use of multiple cores and threads has further improved the performance. These can also be adjusted using CsoundQt's configuration panel.
In addition to these general Csound adjustments, there are some performance tweaks particularly related to CsoundQt in the panel. The python callback, especially, must be disabled for the best live performance, as shown below in Figure 14.
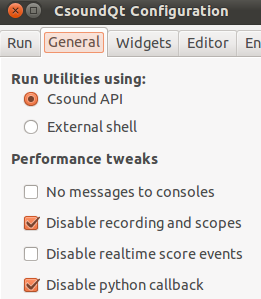
Figure 14. CsoundQt's General configuration settings for Performance tweaks.
Results
In the last few years, I have used Csound more and more in live situations, and I am happy to find it very well suited for that use. Either you can embed Csound in Pd or Max, or you can stay in the Csound world with CsoundQt — which I personally prefer. Certainly you have some additional work then in defining some UDOs for your piece, and sometimes to simplify your GUI. But on the other hand you gain a lot of clarity and consistency in your code and work flow.
I think there are many people using Csound live. It would be great to share those experiences and discuss issues and possible solutions together. I hope this article can be a contribution to this discussion.
Acknowledgements
Thanks to Iain McCurdy and Andrés Cabrera for discussions, suggestions and corrections. Thanks to Anna for reading the manuscript. Thanks also to the participants of the LAC workshop about Live Csound for their attention and resonance.
[1]This can be done traditionally with the scoreline 'f 0 99999' (turns Csound on for 99999 seconds) or with 'e 99999'. Since version 5.15, Csound runs for about hundred years with an empty score. [Barry Vercoe et Al. 2005. The Canonical Csound Reference Manual." New in Version 5.15 (December 2011)", System Changes. [Online]. Available:http://www.csounds.com/manual/html/PrefaceWhatsNew.html. [Accessed September 18, 2012]].
[2]See example "12soft_chnls.csd" from Heintz_examples.zip.
[3]J. Heintz. "Initialization And Performance Pass," in FlOSS Manuals, Csound. Amsterdam, Netherlands: Floss Manuals Foundation, [online document]. Available: http://en.flossmanuals.net/csound/a-initialization-and-performance-pass/ [Accessed August 29, 2012].
[4]Andrés Cabrera. An Overview of Csound Variable Types. [Online] Available: http://www.csounds.com/journal/issue10/CsoundRates.html. [Accessed August 29, 2012].
[5]J. Heintz, and J. Aikin. "Csound In PD," in FlOSS Manuals, Csound. Amsterdam, Netherlands: Floss Manuals Foundation, [online document]. Available: http://en.flossmanuals.net/csound/csound-in-pd [Accessed August 30, 2012].
[6]The name has been changed from QuteCsound to CsoundQt after discussions at the Csound Conference in Hannover in October 2011.
[7]Nokia, Qt SDK. Finland: Nokia Corporation, 2008-2012. Available: http://qt.nokia.com/ [Accessed August 30, 2012]
[8]CsoundQt. For instance, from any of the "Live Collection" examples in the built-in "Examples"e; menu, such as "Live_Delay_Feedback.csd". Available: http://qutecsound.git.sourceforge.net/git/gitweb.cgi?p=qutecsound/qutecsound;a=tree;f=examples/Live+Collection; h=844b98ee6d75bbf3ad5cfeac97e1e16d8978e416;hb=HEAD [Accessed November 3, 2012]
[9]CsoundQt also offers a possibility to store widget states as presets. This is very useful in many cases, but not sufficient here, because here the presets do not affect just widgets, but also determine the effect of a MIDI key pressed, a parameter being set, and more.
[10]Technically speaking: the instrument with the smallest number.
[11]This code is from the instrument above called "MIDI_receive". This instrument is triggered directly by a MIDI note on message. It works during Csound's initialization pass, which is in some cases another option for the "just once" problem.
[12]Barry Vercoe et Al. 2005. The Canonical Csound Reference Manual. [Online]. Available: http://www.csounds.com/manual/html/UsingOptimizing.html. [Accessed August 30, 2012].