Introduction
Usine is a modular visual programming environment specifically designed for performing live music. It excels at triggering and manipulating audio loops on the fly, live sampling and resampling, DJing and improvisation. Usine can also be used to create custom graphical user interfaces and is fully touch multi-touch enabled, offering many unique ways to control Csound in realtime. In this article an explanation of how Usine and Csound can be connected through Usine's SDK and Csound's API is discussed, followed by examples of what can be achieved by combining the two programs together.
I. Configuring Usine and Csound
Installing csound4usine
The first program we need is Usine itself, which can be downloaded from http://www.sensomusic.com/download/. It is available for Microsoft Windows in both free and commercial versions; however, the free version is fully functional and suitable for all the examples in this article. Usine is a portable program so just extract the .zip file and double-click the Usine icon to run it.
The csound4usine (c4u) user module is currently compiled against Csound 5.13.1-doubles so please ensure you have a working installation of this version of Csound. Next, download c4u from here and extract the .zip file to a suitable location. Please note that any Csound .csd files you wish to use must be stored in the same directory as c4u.
The first time you run Usine you will need to configure your audio setup. Navigate to Setup->Global setup (or press ctrl+F5) and select your audio and midi options. Next, switch to the setup screen's interface tab, click the "patch library" heading and select the directory where you extracted c4u to. For all the other options the default settings will likely suffice.
II. csound4usine
Controlling Csound via the Csound API
The Csound application programming interface (API) allows external programs to control instances of Csound through a set of defined function calls. In the case of c4u, we can also use the Csound API to effectively embed instances of Csound directly into Usine through the Usine C++ software development kit (SDK).
Usine's SDK is simple to use; it just defines a basic user module from which you inherit and add the following specifications:
- Declare the data inlets/outlets you wish to expose to Usine. In the case of c4u, we have an input to load .csd files, MIDI input/output, six generic data parameters, and stereo audio inputs/outputs
- Provide a function for dealing with incoming events passed from Usine to our declared data inlets
- Provide a function for processing blocks of audio samples
When c4u is first loaded into Usine it creates an instance of Csound and initializes it ready to compile a .csd file. We can then use c4u's file input to select a .csd to be compiled by Csound. Usine then passes blocks of data to be processed into c4u's audio inputs. We simply copy this data to Csound's input buffers, call Csound::PerformKsmps() and copy the processed data back from Csound's output buffers to c4u's audio outlets.
We can control c4u through its six generic data parameters. These are mapped to Csound's software busses so that their values can be accessed in the compiled .csd file using the chnget opcode. This allows us to automate Csound by connecting Usine's knobs, sliders, LFOs, sequencers, XY pads etc to these parameters. We can also send data back to Usine at control rate using the chnset opcode, allowing us to automate Usine using Csound. Since these parameters may be used for many different purposes, they operate on data normalized to the range 0Ł1 so values may need rescaling before/after passing through the busses.
For complex Csound instruments requiring more than six parameters, we can use the OpenSoundControl (OSC) protocol to pass data between Usine and Csound. Using OSC has the advantage that data of any value can be sent rather than just those normalized to the range 0Ł1. Also, by using OSC we can pass different types of messages to Csound, such as strings containing file names or file paths etc.
III. Examples
One of the most interesting aspects of c4u is that we can use Usine's interface builder to control Csound. In this section we will look at some examples of this.
Example 1: Gain
As is traditional with audio software, we start with the ubiquitous gain example. Below is the code to a simple Csound instrument that changes the volume of audio passing through it. Save this code as a Csound file called gain.csd in the same directory as where you installed c4u.
<CsoundSynthesizer><CsInstruments>sr = 44100ksmps = 16nchnls = 2instr 1kgain chnget "param1"aL inch 1aR inch 2outch 1, aL * kgain outch 2, aR * kgain endin</CsInstruments><CsScore> i1 0 10000</CsScore> </CsoundSynthesizer>
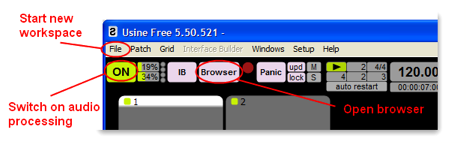
Now we need to create our patch in Usine to use this Csound file. Open Usine and start a new workspace, then switch on the audio engine and open Usine's browser as shown in Figure 1.
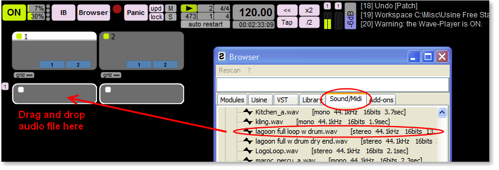
Next, navigate to the browser's Sound/Midi tab shown in Figure 2, select an audio file and drag and drop it onto the first track's patch panel.
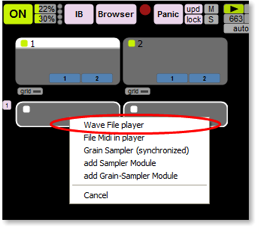
Select "Wave File player" from the contextual menu, shown in Figure 3, and then click the play button that appears to listen to the sample.
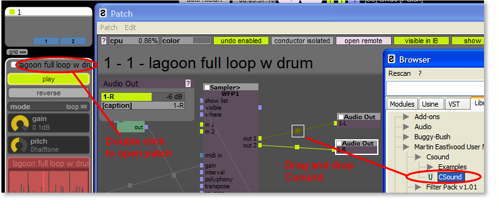
Now we are ready to add our Csound effect. Double-click the header of the track panel, shown in Figure 4, to open the patch and navigate to the Library tab of the browser. Drag and drop the Csound user module, shown in Figure 4, onto the yellow square on the cable connecting the Sampler's out 1 to the left audio output. This will automatically add Csound to the patch.
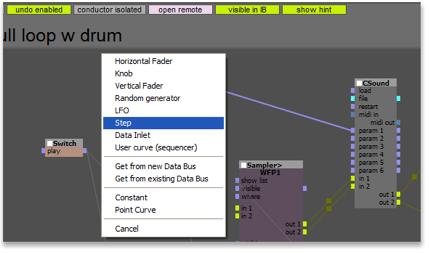
The final step is to load the gain.csd file into Csound by clicking the load button. We can then use param 1 to control the volume of the audio. Let us automate it by clicking on c4u's param 1 inlet and dragging and releasing to add a step module, as shown in Figure 5.
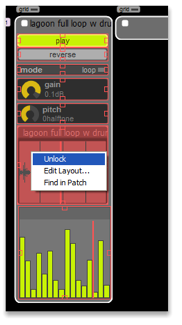
Right-click in the patch's panel in Usine's main window, select unlock and reposition the step module so that you can see it correctly. Lock the panel again and you can now automate c4u's output gain, shown in Figure 6, using the step sequencer.
Example 2: Recordable XY Pads
Instead of using c4u as an effect, we can use also Csound to synthesize audio. Copy the code below and save it as a .csd file into the same directory into which you installed c4u.
<CsoundSynthesizer><CsInstruments>sr = 44100ksmps = 128nchnls = 2instr 1kgain chnget "param2"kpitch chnget "param1"kpitch port kpitch, 0.1kgain port kgain, 0.1aout oscili 10000 * (1-kgain), 500 * kpitch, 1outch 1, aout outch 2, aout endin</CsInstruments><CsScore>f 1 0 1024 10 1 i 1 0 10000</CsScore></CsoundSynthesizer>
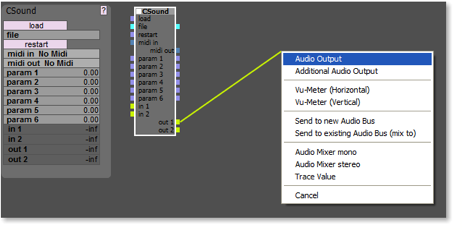
Start a new workspace, open the patch and drag and drop Csound into it from the browser. Then click and drag to add Audio Outputs from c4u's out 1 and 2, as in Figure 7.
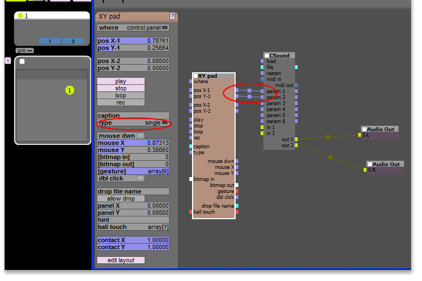
We are going to control c4u using an XY pad so navigate to modules->Interface Design->XY Pad in the browser and drag and drop it into your patch, selecting the two balls max mode from the contextual menu that appears. Change the XY pad's mode to single and connect it's pos X-1 and pos Y-1 outlets to c4u's param 1 and param 2 inlets, as shown in Figure 8. We can now use the XY pad that appears in the patch's panel to control the volume and pitch of c4u's output.
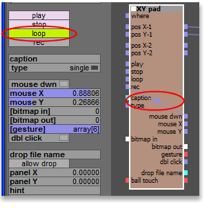
Let us next make the XY Pad automatically record and play back our gestures by connecting its mouse down output to it's record inlet and changing the mode to loop shown in Figure 9. Now try dragging the ball around the XY Pad and it should replay your movements.
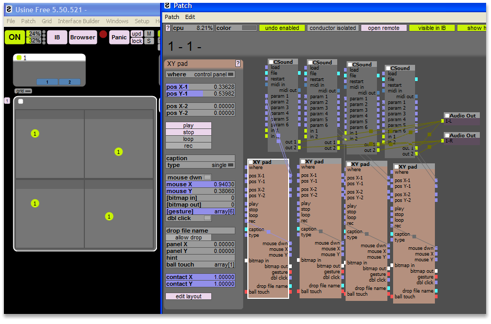
We can use multiple instances of c4u in a patch so shift-click on the XY pad and c4u to select them both and then press ctrl-c to copy them to the clipboard. Press ctrl-v three times to create some copies and connect them to the previous audio outputs. Then unlock the patch panel as before and reorganize the XY pads so you can see them all. We now have four unique instances of Csound running simultaneously that can each be controlled and looped by their individual XY pads, shown in Figure 10.
Example 3: MIDI Draw
The final example demonstrates how to use realtime MIDI support in c4u to receive MIDI notes generated by Usine. As before, save the code below as a .csd file in the same directory as c4u.
<CsoundSynthesizer><CsOptions>-+rtmidi=null -M0 </CsOptions>sr = 44100ksmps = 16nchnls = 2garev init 0instr 1ipch cpsmidi iamp ampmidi 10000aenv madsr 0.5, 0, 1, 0.5a1 oscili iamp, ipch, 1garev = garev + (a1*aenv)endininstr 99 aL, aR reverbsc garev, garev, 0.6, 12000, sr, 0.5, 1outch 1, aLoutch 2, aRgarev = 0endin</CsInstruments><CsScore>f 1 0 1024 10 1 i99 0 10000</CsScore></CsoundSynthesizer>
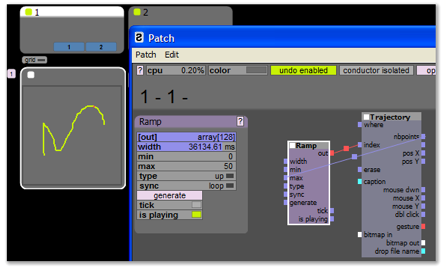
Start a new workspace, open the patch and drag and drop a Ramp module into it from the Modules->Data->LFO section of the browser. Next, add a Draw Trajectory module from the browser's Modules->User section and connect them together as shown below in Figure 11. You can now draw directly into the tracks's patch panel and the module will automatically iterate through the co-ordinates of your drawing. Increase the Ramp's width parameter to slow down rate of iteration as this will control the rate of our MIDI generation.
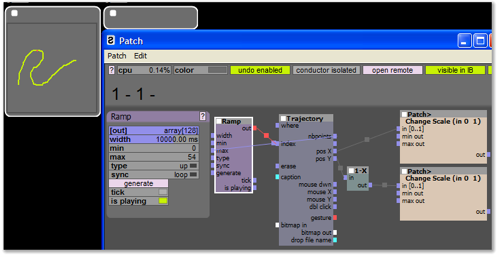
We are going to use Trajectory's co-ordinates to create MIDI notes so we need to scale them from 0Ł1 to 0Ł128. Add two "Change Scale (in 0..1)" modules to your patch from Modules->Data->Data Manipulation in the Browser, set their max parameter to 128 and connect them to the Trajectory's pos X and Y outlets. By default Trajectory's Y co-ordinates range from 0 at the top of the patch panel to 1 at the bottom. Let us reverse this behavior by dropping a "1-X" module directly onto the square on the connection between Trajectory's pos Y and the Change Scale module. This can be found in the Math modules section of the browser, shown in Figure 12.
We need to control our MIDI generation so that we only create one note per co-ordinate. We can do this by limiting the flow of data so that data only passes when Trajectory's index changes from one integer value to another. These modules can be found in the Events and Math sections of the browser, shown in Figure 13.
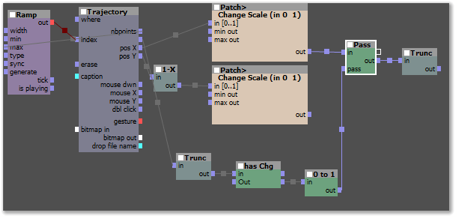
Now we are ready to create our MIDI (musical instrument digital interface). Add two "Create MIDI" modules to the patch and set one of them to produce a NOTE ON message and the other to produce a NOTE OFF. We can then use the X co-ordinate to set the note's pitch and the Y co-ordinate to control its velocity. We also need to delay our NOTE OFF trigger so that it is not sent at the same time as the NOTE ON message by adding a "Data Delay" module, shown in Figure 14.

The final step is to add c4u to the patch, create its audio outputs and then connect the two "Create MIDI" modules to its MIDI in, shown in Figure 15. Load the .csd file you saved earlier and you can now create music by drawing directly into Usine. We could expand on this patch further by maybe adding a knob to the Ramp's width parameter to control the rate of MIDI output, or to the Delay Data module's delay input to control the note length. How about adding some more c4u modules to the patch to create some audio effects using Csound? Do not forget that you can right-click on the patch panel, select unlock and make the drawing area larger.
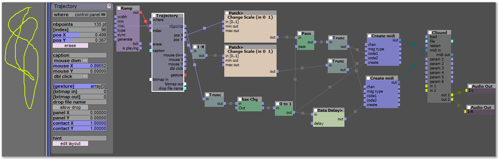
Figure 15. Usine Ramp and Trajectory modules combined with MIDI patching.
IV. Conclusions
In this article we have seen some basic examples of how to control Csound in realtime using Sensomusic Usine. There are many more unique ways the two programs can be used together so interested readers are encouraged to explore Usine further as a frontend for using Csound live.
V. Further Information
A video demonstration of c4u being used live in Usine can be viewed at here.
A video demonstration showing how to create examples one and two from above can be viewed at here and here.
VI. Acknowledgements
Thanks to Yan Le Dean for beta-testing c4u and helping develop the examples and video.